
PLCTool plugin support

The newly implemented plugin support of PLCTool allows for the addition of new functionalities without the need of modifying the base code
This article presents PLCTool’s plugin support and offers a guide of implementation of new plugins, so the users can add new functionalities to the tool and adapt it to their needs.
In the previous article, the PLCTool software was presented as a tool for the inspection and analysis of PRIME networks, the main communication system of most energy meters in current households. This tool features basic auditing functionalities for these networks such as turning on and off energy meter given a password that is commonly shared in the network without encryption.
In the last PLCTool update plugin support feature has been added and this article explains the steps to implement new functionalities via the development of a new plugin.
1. Plugin management
In PLCTool version 1.1.0, plugin support has been added so new functionalities can be implemented without the need of any modification or recompilation of PLCTool. This makes the development of the tool and the investigation on PRIME and DLMS protocols more agile.
PLCTool has also been added to the Archlinux AUR repository, which makes installation easier and allows for a quick plugin development start.
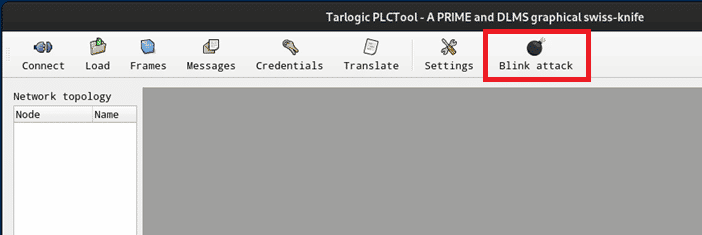
2. An example plugin, BlinkAttack
You can find the code for this plugin in the public repositories of Tarlogic.
This plugin uses data associated with an energy meter, which can be obtained by capturing PRIME packets with PLCTool, to establish a connection and send messages that force the meter to turn on and off continuously.
Before compiling the plugin, it is necessary to have PLCTool installed on the system. To compile it, you can follow the steps described in this article. Then, it can be installed with the command:
% sudo make install
If using the Arch Linux distribution, the package published in the AUR repository can also be used.
The plugin project file, PLCTool-Plugin.pro, is in the root folder of the repository and can be opened with Qt Creator or manually compiled with the following commands.
% cd PLCTool-Plugin
% mkdir build
% cd build
% qmake PREFIX=/usr ..
% make
% sudo make install
This example includes the use of the prefix variable that specifies where the user wants to install the program on the system. The use of the install target of the Makefile that will install the plugin in the specified prefix is also exemplified.
Unlike the PLCTool project, this time the compilation will not result in an executable but in a dynamic library. In the project folder we will now have a libBlinkAttack.so file that we can load in PLCTool to be able to execute the implemented functionality.
PLCTool has several paths where it will look for plugins and load them automatically during startup. These paths, in order of preference, are:
- ~/.plctool
- ~/.local/lib/plctool
- /usr/local/lib/plctool
- /usr/lib/plctool
- /lib/plctool
- Current execution path
To use the new plugin simply open the PLCTool and it will load the library at startup. PLCTool will look for the entry function within the library to verify that what has been loaded is a valid plugin and, if everything goes well, it will add a new icon to the interface to launch it.
3. 3. How to develop a new plugin
Qt (5.9 or higher) is needed to compile and develop new plugins.
3.1. Qt project file
The Qt project file, the .pro file, for the development of a new plugin follows the basic rules of qmake, which can be found in the official manual. However, the following indications must be considered.
The PLCTool header files, where the classes that will be used as a base for the plugin are described, must be included in the project. To do this, the header files must be installed in the system, or the user must add them manually by modifying the .pro file with the following line:
INCLUDEPATH += /Ruta/a/PLCTool/include/
The other relevant item is the new library’s installation directory, which should be one of the PLCTool search paths listed above. This is achieved with the following lines.
TARGET = BlinkAttackPlugin
TEMPLATE = lib

isEmpty(PREFIX) {
  PREFIX=/usr/local
}

target.path=$PREFIX/lib/plctool
First, the name and type of the project (dynamic library) are defined and the installation prefix, PREFIX, is indicated, which can be modified during compilation.
To get started, we recommend reusing the .pro file from our example plugins as a base or creating a new Qt Creator Dynamic Library project.
3.2. Execution process
Before describing the development of a plugin in more detail, it is necessary to have an overview of the architecture.
When a plugin is selected from PLCTool, an instance of the AttackController class is created, and it asks the AttackFactoryLibrary for the necessary parameters for execution through the AttackManager. AttackFactoryLibrary queries the corresponding AttackFactory and returns a list of parameter names. With these, the AttackController displays a window where the user can enter the necessary values:
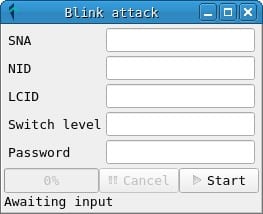
By starting execution via the start button, the AttackController notifies the AttackManager to create an object of type Attack and starts it.
The object is initialized with an instance of the PrimeAdapter class, which manages communications with the adapter to the PRIME network (ATPL360-EK kit), connected to the host via a serial port, as indicated in the article PLCTool, the Swiss Army Knife of smart meters. In this way, data can be sent and received to the PRIME network.
For more details, it is recommended to check the plugins included with PLCTool in the following repository.
3.3. Implementing the classes of a new plugin
In the previous explanation two fundamental classes for the implementation of a new plugin can be appreciated: AttackFactory and Attack. The first implements the constructor of new Attack classes (factory pattern) and informs the rest of the application of the necessary parameters, while the second specifies the behavior. We’ll also talk about the AttackFactoryLibrary class, which contains references to the registered AttackFactory classes, and the entry function, which serves as the entry point for loading the plugin.
3.3.1. AttackFactory class
To specify the required parameters, which are different in each case, and to implement the creation in a standardized way, a factory pattern has been used. The AttackFactory class provides three methods that must be reimplemented in a subclass, such as BlinkAttackFactory:
- QString getAttackName(void): returns the name of the function. This will be the name used in the GUI window and is also used as a reference when requesting the creation of a new Attack object.
- PLCTool::Attack *getAttack(…): returns a new Attack object by calling its specific constructor, and sends the parameters received from the graphical interface as a StringParams object. In addition to the parameters, it provides the object with a reference to PrimeAdapter, which enables communication with the PRIME adapter (ATPL360-EK kit).
- QList<QString> getAttackParamList(void): must return a list with the names of the parameters, which will be used in the creation of the graphical interface.
3.3.2. Attack class
The functions must be implemented as subclasses of the Attack class. BlinkAttack can be taken as an example:
class BlinkAttack : public PLCTool::Attack
  {…}
Note that the Attack class is defined within the PLCTool namespace, which is used for all the classes provided by the tool. The Attack class defines three virtual methods, which act as Qt slots, and must be overridden by the new class:
- void onStart(void): it is executed when the start button of the graphical interface is pressed.
- void onCancel(void): it is executed when the cancel button of the graphical interface is pressed.
- void onEnd(void): it is executed before ending the execution and disconnecting the object from the graphical interface.
In case one of the methods is not defined, the base Attack class defines a basic behavior that simply sends the corresponding signal back to the AttackController indicating that the slot was executed.
In addition to the above methods, Attack defines a set of signals with which messages can be sent to the controller:
- void attackStarted(void): indicates that the initialization tasks have completed and execution has started.
- void attackProgress(float progress): tells the interface the percentage of the execution to update the progress bar of the window.
- void attackStatus(QString status): displays a status message in the graphical interface.
- void attackCompleted(void): indicates that the execution has been completed successfully.
- void attackFailed(QString message): indicates that the execution has failed.
- void attackCancelled(void): Indicates that a cancellation signal has been received and execution has ended.
- void attackTimeout(void): indicates that the execution has ended unsuccessfully due to a timeout.
- void attackEnded(void): Indicates that the Attack object is ready to be destroyed.
In addition, another special signal is defined: void attackCreated(PLCTool::Attack *attack). This signal indicates to the controller that the creation of a new Attack object is complete, it is sent by the AttackManager and should not be used during execution.

3.3.3. Entry point and AttackFactoryLibrary
During the loading of a plugin, PLCTool looks in the default paths for dynamic library files and tries to load the entry function defined in them. If such function is found, it is executed passing the AttackFactoryLibrary object of the current execution as an argument. This object holds references to AttackFactory objects that will be used for creating Attack objects.
It is therefore the task of the entry function to register the new plugin’s AttackFactory by calling the AttackFactoryLibrary::registerAttackFactory(…) method. Here’s an example of how to do it for BlinkAttackPlugin:
extern "C" {
void entry(PLCTool::AttackFactoryLibrary *);
}

void
entry(PLCTool::AttackFactoryLibrary *attackFactoryLibrary)
{
  attackFactoryLibrary->registerAttackFactory(
      new BlinkAttackFactory(attackFactoryLibrary));
This code can be found in BlinkAttackPluginEntryPoint.cpp and can be used as a basis for creating new plugins. It is important to declare entry inside a “C” extern block, to prevent the C++ compiler from changing the name of the function.
These classes are enough to implement and load a basic plugin, but to interact with the PRIME network, the next section briefly describes some useful classes.
4. Other relevant classes
This section describes the classes PLCTool uses to compose and send PRIME and DLMS messages to the PLC network, as well as how to interact with the adapter.
4.1. PrimeAdapter
The PrimeAdapter class enables sending and receiving messages in the PRIME network. The class interacts with the adapter connected to the host through a serial port, in our case, the evaluation kit ATPL360-EK. On its creation, a new Attack object receives a reference to the PrimeAdapter object of the current PLCTool process, so that it can use it for communication with the PLC network.
For reading data from the network, the class implements the following Qt signals:
- void subnetAnnounce(…): emitted when a new beacon is received announcing the existence of a concentrator.
- void meterFound(…): emitted when messages from a new meter on the network are found.
- void frameReceived(…): emitted when reading a PRIME frame, whether or not it contains DLMS data.
- void dataReceived(…): emitted when reading DLMS data in a PRIME frame.
- void closed(void): emitted when closing the connection to the adapter.
By connecting these signals to slots in the Attack subclass, or any other class, it is possible to receive the network events.
Likewise, PrimeAdapter has the writeFrame(…) methods, to write data to the PLC medium, setLcd(…), to send data to the adapter’s LCD, and setLeds(…), to establish the status of the adapter’s LEDs.

4.2. Prime
The data written by writeFrame(…) is sent over the physical layer of PRIME. To send data relevant to the MAC layer, the types defined in PrimeFrame.h can be used. The PrimeFrame class defined in this header allows the user to set the message fields and provides methods to transform the message into a byte array that can be sent through PrimeAdapter.
For a practical example of use, refer to the compose methods of the BlinkAttack example plugin.
For more information on the PRIME 1.3 standard, the reader can consult the official website.
4.3. DLMS
To parse and create DLMS messages contained in a PRIME frame (DATA field), a set of classes have been designed and are available in the Types/ber and Types/dlms directories of the PLCTool header files.
DLMS messages are defined as ASN.1 types. For this reason, it is convenient to know the notation for the study and implementation of DLMS messages.
Specifically, DLMS defines messages using the BER encoding, typical of ASN.1, or the A-XDR encoding, which, despite its name, has little to do with XDR encoding. A-XDR is actually an encoding derived from BER in which the value of certain fields in the message is assumed.
For a deeper understanding of BER encoding and ASN.1 notation, we recommend reading the technical note written by RSA Labs on the matter.
The necessary messages for the execution of the current functions are implemented in the classes provided by PLCTool. A practical example of its use can be found in the compose methods of the BlinkAttack plugin.
For more information on DLMS messages, it is recommended to consult the BlueBook of the DLMS standard, as well as the use of the built-in translator in PLCTool, which translates DLMS messages to XML thanks to the gurux library.
Thanks to the new support for PLCTool plugins, the swiss army knife of PRIME networks can now implement new functionalities and adapt to the needs of the user, allowing for customization and automation of the auditing tasks in energy metering networks.
The BlinkAttack plugin is an example of the capabilities that the tool can implement, and the possibilities offered by the investigation of these networks. Help us in our research by creating new features and improving their usefulness.
Keep up to date with the latest Tarlogic news in our blog.
This article is part of a series of articles about Smart Meters
- Smart Meters – The Spanish Scenario and the Telemanagement System
- Smart Meters – Threats and Attacks to PRIME Meters
- Smart Meters – A proof of concept: hacking a smart meter
- Smart Meters – Assessing Concentrator Risk
- Security in PRIME networks – Current status
- PLCTool, the Swiss army knife of smart meters
- PLCTool plugin support