
WiFi passwords cracking using Pyrit in Amazon ec2
Amazon AWS includes in the Elastic Compute Cloud (EC2) catalog two optimized instances in order to use parallel computing based on GPU.
cg1.4xlarge instance belonging to the previous generation of instances has 22 GiB of RAM, 33,5 units EC2, 2 GPU NVIDIA Tesla “Fermi” M2050, 690 GB of local storage and a connection. With the new generation, Amazon has introduced the g2.2xlarge instance providing 15 GiB of RAM, 26 units EC2, 1 GPU NVIDIA GRID (Kepler GK104), 60 GB of local storage and 10 gigabits Ethernet connection.
These types of instances are suitable in order to carry out punctual cracking tasks, since Amazon gets paid based on instance hours consumption. Therefore, in case of non-acquiring specific hardware for this purpose, using Amazon EC2 could be a good idea to crack WiFi passwords.
In this article, how to prepare a cg1.4xlarge or g2.2xlarge instance is going to be explained in order to use cracking tools using computing based on GPU, such as Pyrit.
First, start the instance with AMI (Amaxon Machine Image) Amazon Linux AMI (HVM), which currently holds the ami-7c56b80b identifier. This AMI has been created by Amazon in order to use this type of instances requiring servers hardware interaction.
Whenever the instance has finished the starting phase, a SSH connection could be established, with the ec2-user user in order to carry out the necessary utilities installation. For this purpose, please, follow the steps explained below:
- CUDA, Pyrit y Scapy tasks installation.
# yum -y install subversion python-devel openssl-devel zlib-devel libpcap-devel glibc-devel gcc kernel-devel gcc-c++
- CUDA download and installation.
# wget https://developer.download.nvidia.com/compute/cuda/5_5/rel/installers/cuda_5.5.22_linux_64.run

# chmod +x cuda_5.5.22_linux_64.run

# ./cuda_5.5.22_linux_64.run
- PATH and LD_LIBRARY_PATH environment variables update, as shown in CUDA installer.
# export PATH=/usr/local/cuda-5.5/bin:$PATH
- Scapy download and installation, used by Pyrit for package management.
# wget https://www.secdev.org/projects/scapy/files/scapy-latest.zip

# unzip scapy-latest.zip -d scapy

# cd scapy/*/

# python setup.py install
- Pyrit download and installation
# svn checkout https://pyrit.googlecode.com/svn/trunk/ pyrit
Once Pyrit installation is finished, it will be possible to view the processors we could interact with. For this purpose, please run the following command:
# pyrit list_cores
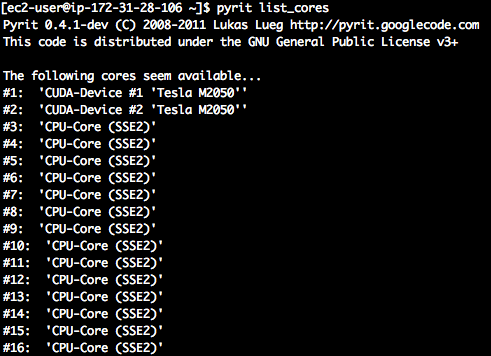 Image 1: cg1.4xlarge instance cores
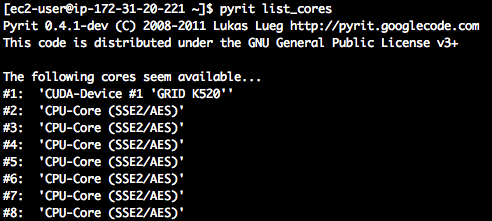
Image 2: g2.2xlarge instance cores
In order to check the performance that Pyrit can obtain in each instance type, the following command can be used:
# pyrit benchmark
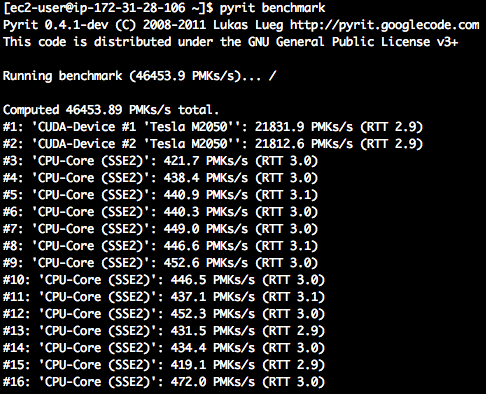
Image 3: cg1.4xlarge instance benchmark
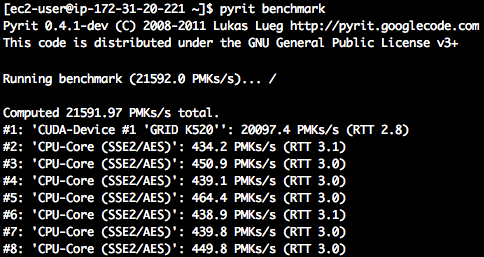
Image 4: g2.2xlarge instance benchmarck
As it can be seen in the number of PMK per second that Pyrit is able to process in an instance of the previous generation, this is actually more than double regarding current generation instances. Then, although performance is lower, in economic performance terms, it is definitely more profitable the new generation instance (g2.2xlarge), since the cost per hour of this one is $0.702 compared to $2.36 of a previous generation instance.
In the following article, how to create an instance farm using Pyrit will be explained in order to boost the performance without drastically increasing economic costs.
Discover our work and cybersecurity services at www.tarlogic.com