
Reverse Engineering Dahua NVR/XVR Devices and Breaking Their Boot Security
Table of Contents

Modern embedded devices increasingly incorporate security mechanisms that go far beyond the traditional IoT model. Encryption, custom bootloaders, signed firmware are becoming the norm, or at least, in theory. In practice, however, many implementations fall short of secure-by-design principles.
In this article, a walk through the technical work behind the analysis of two video recording devices is presented, revealing how hardware access, bootloader behavior, and cryptographic routines uncover weaknesses that allow attackers to bypass security barriers. This research was originally carried out as part of our internal hardware security exercises and expands on the notes and findings shared in a BlackAlps 2025 talk.
Context
This arose from an internal training exercise that focused on hands-on hardware security assessment.
The assessment centered on two Dahua video recording units readily available: DHI-NVR2104-4KS2 and DH-XVR4104HS-I. Both devices share similar hardware, firmware layouts, and boot chains.
The initial objective was simple, extract the latest firmware directly from the device. This was a realistic goal for possible attackers conducting physical compromise or supply-chain tampering and it fitted the skills that should be practiced during the training.
Hardware Attack Surface
Opening the recorders revealed the usual set of components for devices of this class. Many connectors found are intended for users to plug other devices into such as the back ports or the internal SATA connector for a hard disk drive.
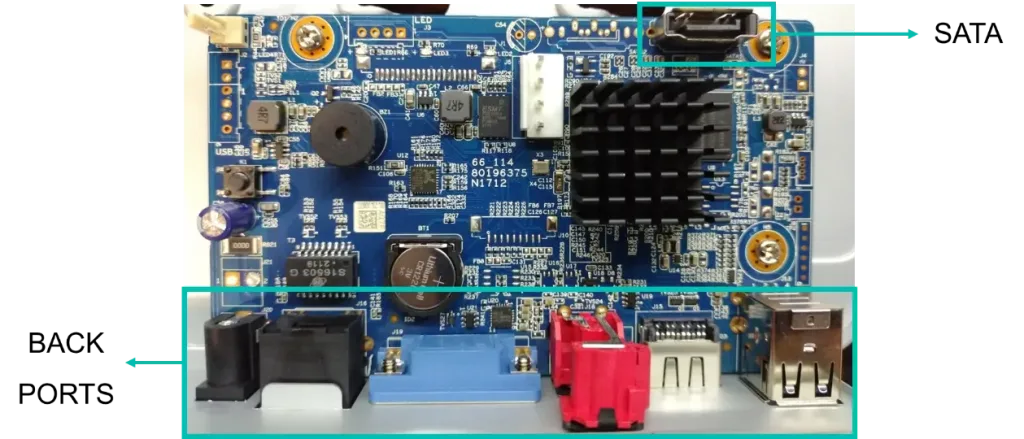
Alongside these documented ports and easy to identify, there were a lot of ports of undocumented nature that could serve our purpose for an initial access to the device.
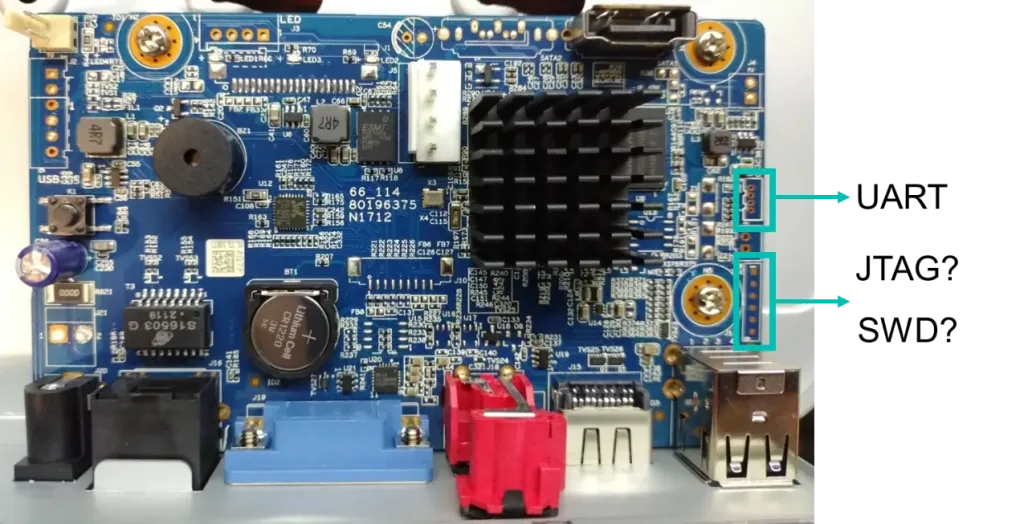
UART Access
Using the logic analyzer, the different board connectors were probed. Attempting to identify additional debug interfaces (JTAG/SWD) suggested possibilities, but finding a clear UART alone already granted significant leverage.
Once the UART port was correctly identified, an adapter was soldered to be able to read and write to the port.
A first boot log revealed the following text:
System startup
U-Boot 2010.06-svn4868 (Sep 24 2020 - 09:56:33)
Check Flash Memory ContCheck Flash … Found
ECC provided by Flash Memory Controller
Hit any key to stop autoboot: 3 … 2 … 1 … 0
…
Image Name: Linux-3.18.20
Image Type: ARM Linux Kernel Image (uncompressed)
Data Size: 3768619 Bytes = 3.6 MiB
Load Address: 80008000
Entry Point: 80008000
Kernel data secure check, please wating …
sec_commonSwRsaVerify run successfully!
Loading Kernel Image … OK
Starting kernel …
The bootloader used is U-Boot 2010.06-svn4868, probably, with Dahua-specific modifications to perform some non-standard security checks or verifying software signatures.
We can see some messages regarding the load of an old Linux Kernel version but after Kernel start, no output or shell comes up.
Fortunately, the U-Boot bootloader seems to be configured to allow for boot interruption. After some manual guesses, no shell came out, so a decision to automate the break character search was made…
Using Python, it is possible to interact with serial devices using the pyserial package. Unfortunately, due to the nature of the communication protocols, it is not quick to prototype scripts that wait for text and react to it. Fortunately, the pexpect-serialspawn package combines the waiting for text and reacting part and manage serial port streams allowing us to do exactly what we need.
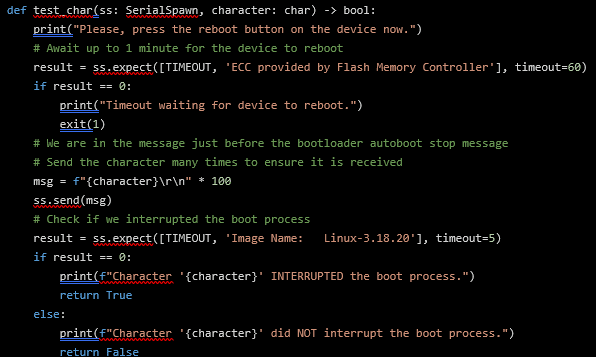
The above Python function uses the pexpect-serialspawn to wait for text indicating that the device has just started booting. Whenever this text is found, it proceeds to send 100 characters to ensure not to miss the bootloader countdown, and finally, text is checked for known strings that occur during the normal boot process. The last check enables the detection of whether the device booted or if it was interrupted.
This test function is run for each ASCII character. The script was able to reveal that the boot process could be interrupted by sending the * character, leading to a bootloader shell.
Bootloader Capabilities and Restrictions
Because no prior information of what U-Boot commands were available, the first command to be typed was the help command:
hisilicon # help
? - alias for 'help'
autoup - load update file from server
boot - boot kernel from uboot
bootm - boot application image from memory
decjpg - jpgd - decode jpeg picture.
devid - devid - set hardware id and save to flashfatload - load binary file from a dos filesystem
fatls - list files in a directory (default /)
fb_set - fb_set - get shift key
fb_test - fb_test - frontboard read/write test
get_key - get_key - get shift key
help - print command description/usage
kaimendaji - kai men da ji
lock_otp - lock_otp - otp lock
…
Although many interesting commands were available, when tested, no output was produced from them… Some kind of mechanism was preventing us from executing them…
As an example, the devid command did produce output, but many others didn’t:
hisilicon # devid
DEVID: DHI-NVR2104-4KS2
hisilicon # nand
nand - NAND sub-system
hisilicon # nand read
not support this cmd
hisilicon # nandops read
hisilicon # nandops read 0x0
hisilicon # xhprint
hisilicon # xhprint ID
hisilicon # xhprintenv
hisilicon # xhprintenv ID
At this point, the bootloader shell did not seem to provide an interface to obtain the firmware of the device, so a step back to look at the hardware was taken…
Memory Dumping
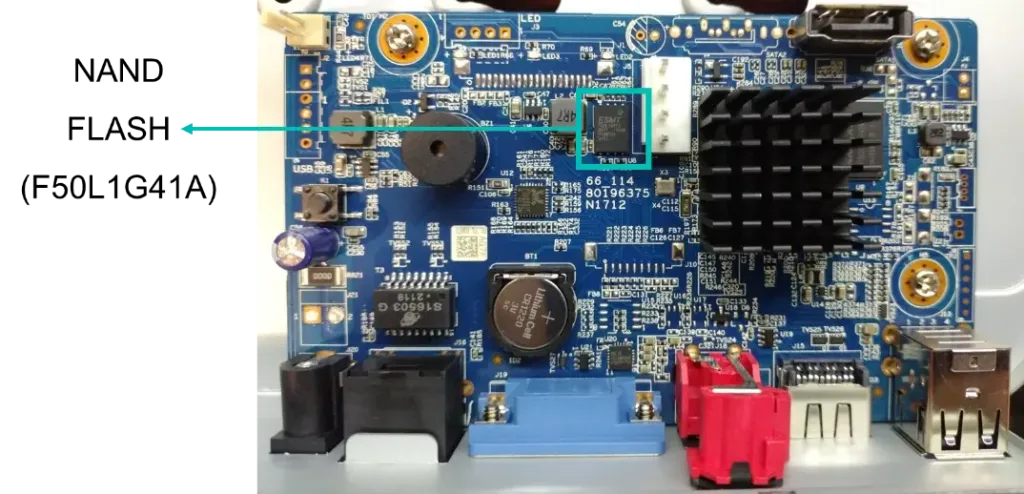
A second look at the hardware revealed an external NAND FLASH memory was being used. It could probably contain the firmware of the device. The memory was desoldered and dumped using a commercial memory programmer.
Using Binwalk, a quick first look did not reveal clear information. Too many false positives hiding the relevant information…
% binwalk dahua_nvr.bin
DECIMAL HEXADECIMAL DESCRIPTION
-------------------------------
262144  0x40000     Flattened device tree, size: 15970 bytes, version: 17
1130639 0x11408F    ESP Image segment count: 1, flash mode: QUIO, flash size: 2MB, entry address: 0x4dd038e3, hash: none
…
1288009 0x13A749    eCos RTOS string reference: "ecos %s"
1296358 0x13C7E6    MP3 ID3 tag,
1296508 0x13C87C    SHA256 hash constants, little endian
…
1319959 0x142417    AES Inverse S-Box
…
4456448 0x440000    Squashfs filesystem, little endian, version 4.0, compression:gzip, size: 40899891 bytes, 9 inodes, blocksize: 131072 bytes, created: 2021-03-12 06:37:13
58196508 0x378021C  Zlib compressed data, best compression
…
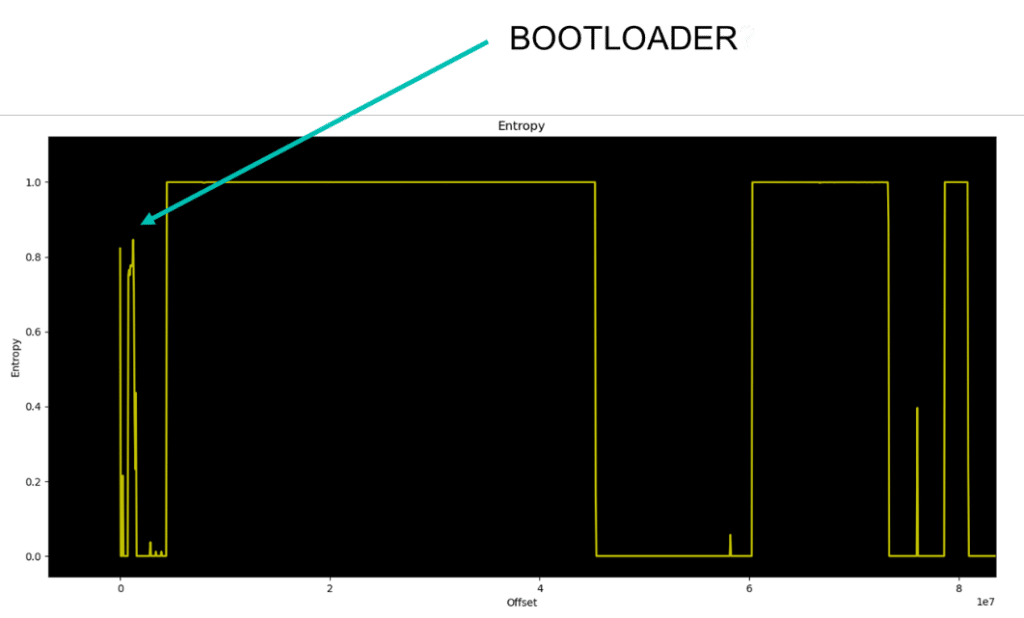
Another tool can provide relevant information to deal with this memory dump. Entropy of the file can be plotted to identify where the density of information is, leading us to identify partitions and the free space between them…
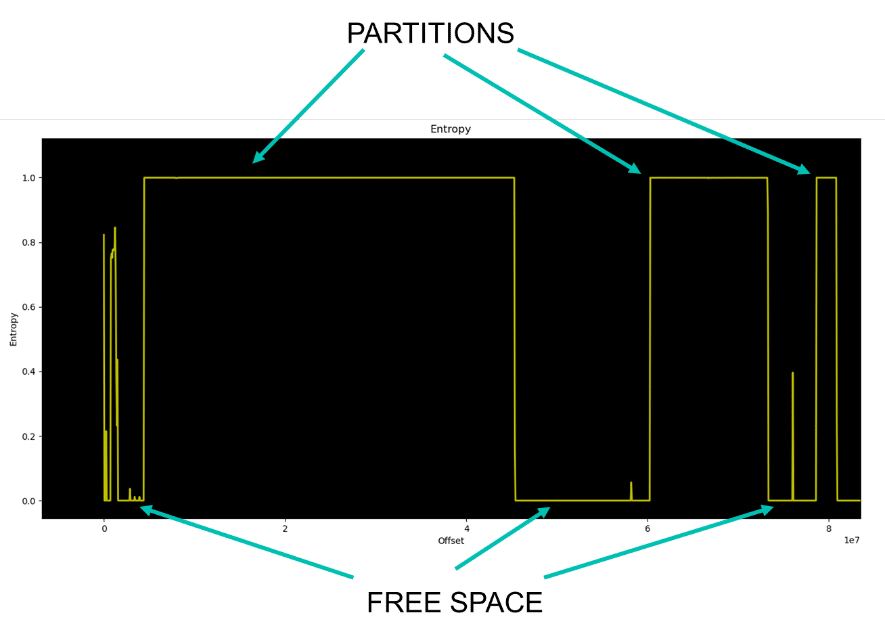
Because we are mainly interested in the binaries added by the manufacturer, most of the interesting stuff should be in the userspace partition, where services and other executables are located.
Because of its contents, usually, the userspace partition is the biggest one…
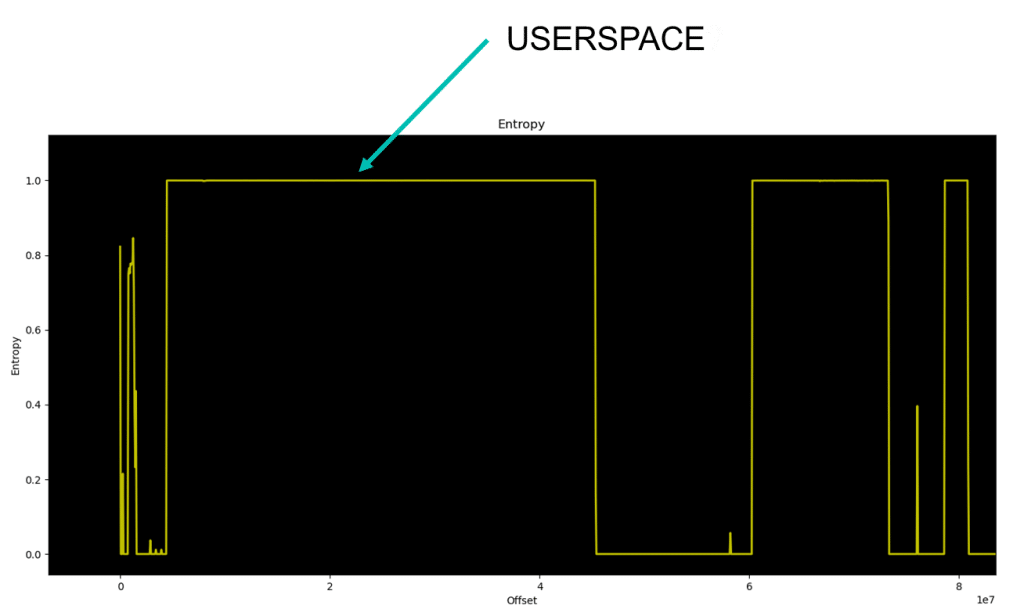
From the entropy graph, now we can locate the start and approximate partition end locations and try to cut the relevant part of the file to a new separate binary. For this, the dd utility can be used.
% dd if=dahua_nvr.bin of=dahua_nvr_userspace.bin bs=$((0x10000)) skip=$((0x44)) count=$((0x271))
40960000 bytes (41 MB, 39 MiB) copied, 0,614597 s, 66,6 MB/s
Now, Binwalk can be used to verify that we have correctly done this operation.
% binwalk dahua_nvr_userspace.bin
DECIMAL HEXADECIMAL DESCRIPTION
-------------------------------
0 0x0 Squashfs filesystem, little endian, version 4.0, compression:gzip, size: 40899891 bytes, 9 inodes, blocksize: 131072 bytes, created: 2021-03-12 06:37:13
Finally, it is recommended to use the unsquashfs utility to try and extract the contents of the filesystem. The unsquashfs utility is preferred to Binwalk for this operation because it provides more information about whether the operation finished correctly or if there were errors in the process.
% unsquashfs dahua_xvr_userspace.bin
Parallel unsquashfs: Using 2 processors
3 inodes (314 blocks) to write
[===============================================================/] 317/317 100%
After a successful extraction, we further investigate the results. The output tree reveals multiple files, some of them point to this being the Kernel and the userspace. There is also a LUA file that seems related to hardware information.
% tree
.
├── boot
│ └── uImage
├── dev
├── romfs-x.squashfs
├── root
└── usr
└── data
└── hardware.lua
Unfortunately, Binwalk does not recognize anything inside these files. Also, entropy measurements for these files reveal that they are probably encrypted…
% binwalk boot/uImage
DECIMAL HEXADECIMAL DESCRIPTION
-------------------------------
26308   0x66C4      xz compressed data
% binwalk romfs-x.squashfs
DECIMAL HEXADECIMAL DESCRIPTION
-------------------------------
…
12181334 0xB9DF56   MP3 ID3 tag,
…
% binwalk usr/data/hardware.lua
DECIMAL HEXADECIMAL DESCRIPTION
-------------------------------
On the bright side, something must decrypt those files! That something is probably the bootloader because it is responsible for loading them.
At this point, we assume that the bootloader will be the first partition of the memory and will cut it into a new binary using the same previous technique.
% dd if=dahua_nvr.bin of=dahua_nvr_bootloader.bin bs=$((0x1000)) skip=$((0x0)) count=$((0xF))
15+0 records in
15+0 records out
61440 bytes (61 kB, 60 KiB) copied, 0,00398486 s, 15,4 MB/s
The output file is validated to contain ARM instructions because it is expected that the bootloader is a plain raw executable file.
% binwalk -Y dahua_nvr_bootloader.bin
DECIMAL HEXADECIMAL DESCRIPTION
-------------------------------
4396    0x112C      ARM executable code, 16-bit (Thumb), little endian, at least 1002 valid instructions
Once our hypothesis is validated, we can move on to analyze the bootloader using Ghidra…
Reverse Engineering the Bootloader
Because the bootloader is a plain raw binary, it is needed to collect information about the architecture and where it is loaded. Architecture is ARM little endian as pointed out by Binwalk, but we do not know the loading address. For this reason, the binary is initially loaded at address 0 in Ghidra.
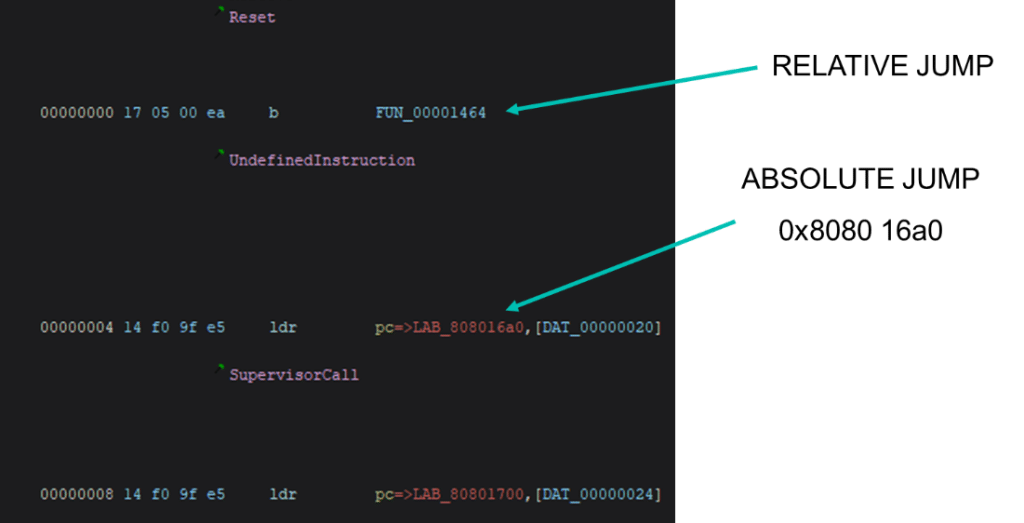
The first instructions we find at the beginning of the bootloader is an IVT (Interrupt Vector Table). This table points to different functions that handle exceptions and other events. Particularly, the first one contains a relative jump and does not provide much information regarding loading address, but the second one, is an absolute jump and contains an absolute address reference. Because bootloaders are usually loaded into aligned addresses, rounding this address gives us a promising loading address at 0x80800000.
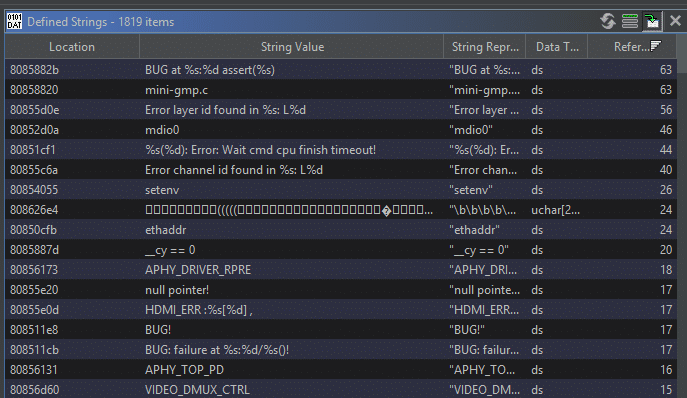
To confirm that 0x80800000 is the correct loading address, the binary is loaded at that address and a look at the strings in Ghidra reveal that almost all of them have references. This is probably right then.
Now that the binary is ready to be analyzed, using the information seen during the boot process, the original U-Boot source code can be located here.
A possible technique to ease the process of reverse engineering is to compare strings we see in the output, the source code and the binary in Ghidra. In this way, we can correlate some of the functions between source and the binary and progressively tag them to gain context.
A possible starting point is the “Hit any key to stop autoboot” message that we saw just before entering the bootloader command line…
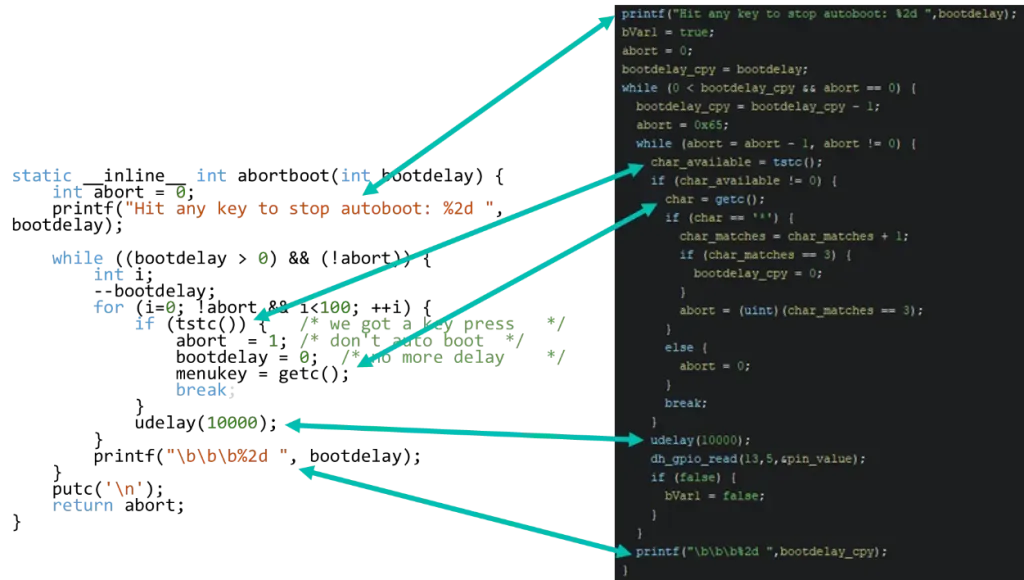
This directly leads us into confirming the stop autoboot character and if we follow the original source code, we locate the command line related functions:
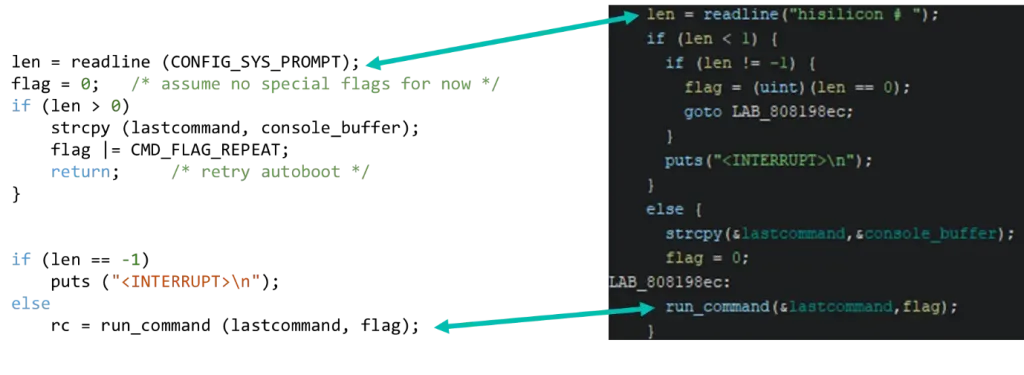
Finally, the run_command function leads us to the U-Boot command table.
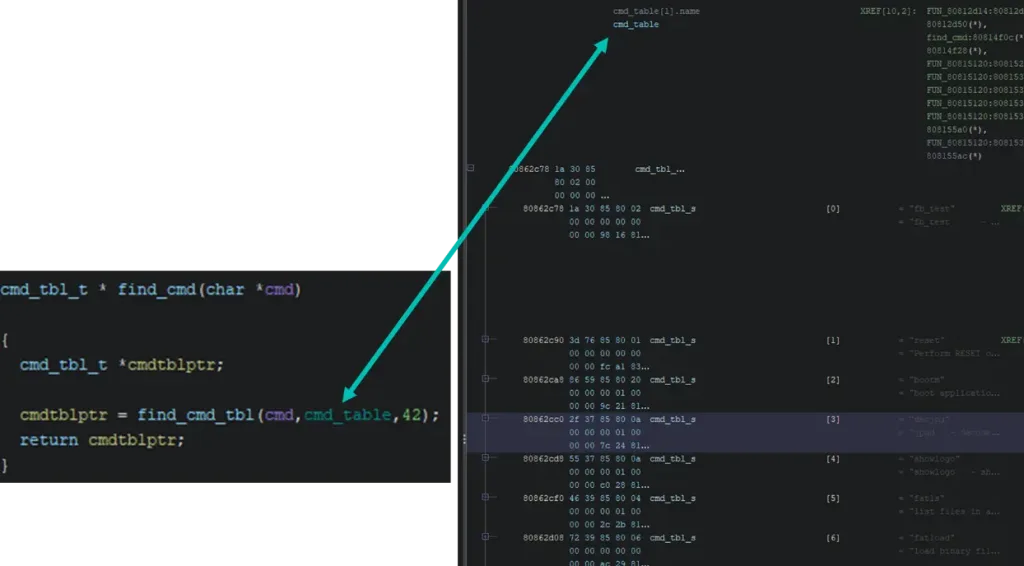
In Ghidra, to define complex data types, the user must input that information by hand. This can often be a tedious process and for this example, the GhidraExtendedSourceParser plugin has been used. It allows the user to simply copy paste the source code we have available, and it will create the table types for us.
Now that the command table is humanly readable, it is possible to look at the implementation of one of the previously locked commands such as xhprintenv.

The command appears to begin by performing an initial lock check. If the check indicates that the command is locked, the function simply returns without doing anything else.
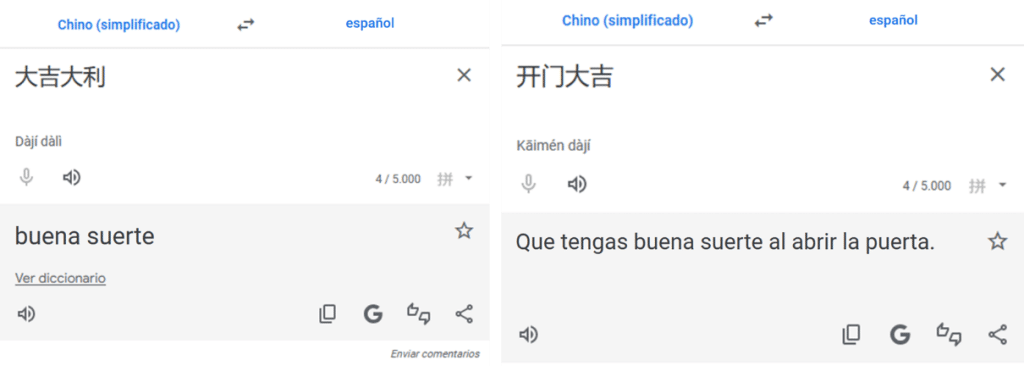
Looking deeper into the lock check function, an environment variable called “dajidali” is used to check if a password has been set. Particularly, the password checking function is related to a custom bootloader command named “kaimendaji”.
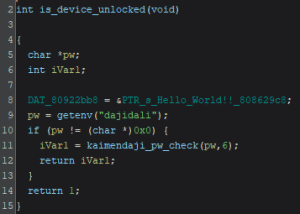
Guessing that the manufacturer is Chinese and given that the variable names do not make much sense in English, a possible translation for both names is…
The Authentication Mechanism
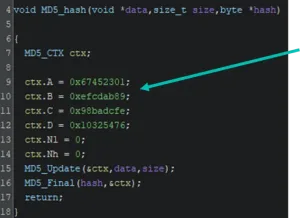
The custom kaimendaji command seems to expect a user password. It then performs some cryptographic operations and checks the results. To identify the related cryptographic operations, the GhidraFindCrypt plugin is used.
Particularly, the plugin looks for common cryptographic constants and tags them. Thanks to that we can identify the MD5 hashing function.
With this information fed into Ghidra, we now can look at the kaimendaji command with a little bit more context. The command checks that a parameter is passed. This parameter is the password and should be 6 characters in length. If the conditions are met, a password checking function is called.
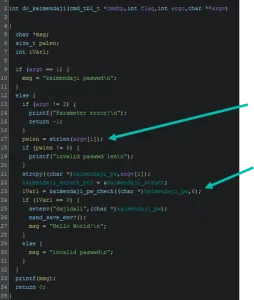
The password checking function just converts the input text to hexadecimal bytes and calls a secondary function that will check the password in byte format. From this, we conclude that the password is just 3 bytes in length and should be easily bruteforced but a deeper dive revealed interesting details…
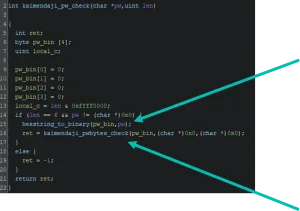
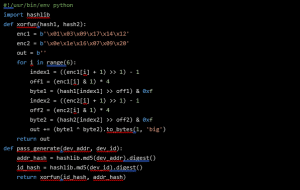
Finally, the bytes checking function obtains the “id” of the device and the ethernet address, hashes them and combines both using a xor function to generate a value to check the password against.

Using this information, we have built a keygen function!
Now, to generate a valid password, we need to know the ethernet address and the “id” of our device. Unfortunately, we cannot print them using the bootloader. The ethernet address can be found in the device sticker but we are unsure of that the “id” of our device is…
A second look at the available commands in the bootloader we find another custom command named “show_hello”.

A deeper look at the program implementation reveals that this command consults both needed parameters and mangles them into a text output that is printed to the command line…
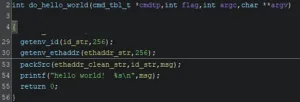
After reversing the packing function, a function implementing the opposite operation is developed:
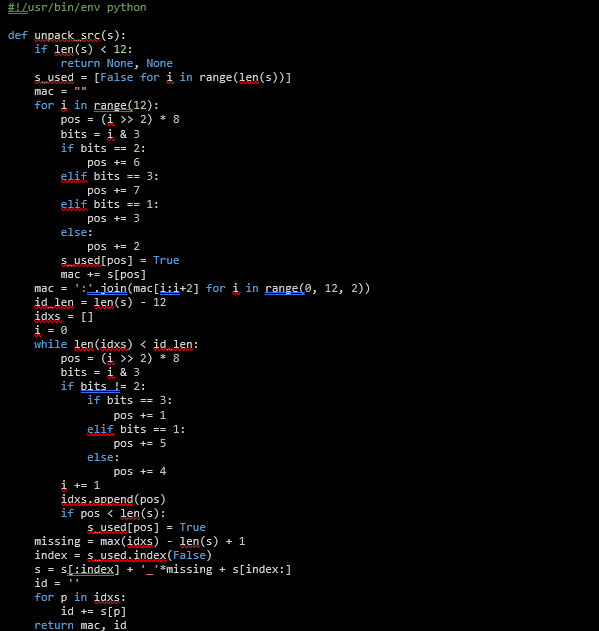
Now the parameters needed to generate the password can be obtained from the bootloader.
The Proof of Concept
The following image shows the boot process. This process is interrupted by pressing the asterisk character multiple times leading to the bootloader shell.
At this point, access is tested by using the xhprintenv command. It does not show any output…
Then, the hello_world command is used to retrieve the encoded “id” and mac address data. Using the keygen a password is generated from that data.
The kaimendaji command is used to elevate privileges and using the xhprintenv we verify that we have elevated privileges. Now environment variables are printed!
Next Steps
Still, after elevating privileges, the xhprint command does not work. That command was a possible candidate to dump memory contents in the device. Despite not having the xhprint command, we are able to dump the decrypted memory contents from the device by using other commands.
To dump decrypted memory, we use the partload command to load into memory the decrypted contents of a partition. Because we cannot print memory, we use the “nandops 1” (nand write) command to write the decrypted memory into an empty nand region. After that, the “nand dump” command allows us to print the decrypted nand region.
It is also interesting to investigate the bootloader environment variables. The following are just some examples:
# Enables verbose kernel & services
hisilicon# setenv dh_keyboard 0

# Stops automatic services and drops a shell
hisilicon# setenv appauto 0

# Prevents from loading some manufacturer kernel modules
hisilicon# setenv load_modules 0
Conclusions
The selected Dahua devices included several advanced security mechanisms such as partition encryption, software signature verification, customized bootloader with authentication routines…
However, implementation weaknesses prevented these mechanisms from providing actual security guarantees. Because the bootloader is not signed, attackers can extract, modify, or replace it. Privilege-escalation safeguards in the bootloader are not correctly designed, and encryption keys are accessible or derivable within the bootloader. Finally, encryption can be bypassed using built-in features meant for maintenance.
This research demonstrates how even commercially mature embedded systems can fail to achieve robust hardware-rooted security. When attackers gain physical access, incomplete boot chains and poorly protected cryptographic mechanisms create opportunities for firmware extraction, key recovery, and unrestricted code execution.
References
BlackAlps 2025 slides:
Tools:
- https://github.com/antoniovazquezblanco/pexpect-serialspawn
- https://github.com/antoniovazquezblanco/GhidraExtendedSourceParser
- https://github.com/antoniovazquezblanco/GhidraFindcrypt
Related advisories: