
We tracked 800 million transactions in the Ethereum Blockchain. Here is how we did it.
Table of Contents
 Something really big is going on the Ethereum Blockchain. Fraud, speculation, financial products, tax evasion, million-dollar robberies, art, games, a new monetary system… You name it.
Whatever you are planning to analyze on the Ethereum Blockchain, it’s necessary to first get the transactions transformed into some usable form.
What is the Ethereum Blockchain? (Big picture)
The Ethereum blockchain is a record of transactions albeit, decentralized and composed of blocks, but a record nonetheless.
Is it the same as Bitcoin?
No. Both blockchains give you the ability to transfer cryptocurrency in each transaction, however Ethereum allows you to also interact with a contract (smart contract).
Smart Contract
A smart contract, strictly speaking, is a EVM (Ethereum Virtual Machine) executable code that can be invoked through Ethereum transactions. Once created on the blockchain they are immutable, so not even the author can modify them.
- From a technical standpoint, a smart contract is a program, consisting of functions, instructions and variables.
- From a more general standpoint: smart contracts have opened up a world of possibilities, as it is possible to create contracts of all kinds, mostly linked to the financial world. Some examples are new currencies (tokens), credit systems, decentralized stock exchanges, NFTs that establish ownership of art pieces, etc.
Distributed… or replicated?
The blockchain is often defined as a distributed database. Perhaps it would be more accurate to use the term “replicated” instead.
The Ethereum network is made up of nodes that are responsible for maintaining this database and adding new blocks to it. All these nodes have an exact and complete copy of the entire blockchain. We will leave aside the procedures used to reliably add new blocks to the database. For the purpose of this article we will focus on how to obtain that database.
How to download the Ethereum Blockchain
The nodes in the Ethereum network need to have the entire blockchain (record of transactions) to operate. In order to do that, they first need to download it. This process is called “synchronization“.
Therefore, the way we can download the blockchain is by setting up an Ethereum node that connects to the network. Once in the network, it will start downloading all the records from the other nodes.
Which Ethereum client to choose
The first step is to choose an Ethereum client to act as a node.
There are several options available, but in this case we will use Geth (Go Ethereum), as it is the most popular and widely supported solution.
*Tip: It is worth mentioning another solution with great potential and very high efficiency: Nethermind. If you have problems with the Geth synchronization speed, it may be worth migrating to Nethermind.
Blockchain synchronization modes
Before launching Geth and beginning the synchronization of the Ethereum Blockchain, we need to choose the sync mode.
Due to the nature of Ethereum there are two fundamental sync modes:
- Fast: This mode will only save the information needed to check the integrity of the blockchain from each transaction.
The goal is to synchronize as quickly as possible with the minimum bandwidth and computational power requirements.
With this mode it is possible to access transaction details such as source, destination, smart contract method to be invoked, parameters, etc. However, it is not possible to access the transaction result. In other words, this mode does not save information about the transactions final status (Failed or Successful), nor the emitted logs, nor the amount of gas used. - Full: This mode will additionally download the information of the transaction receipts. These receipts contain the result of such transactions: gas used, status (failed or successful) and logs generated.
Which sync mode to chose will depend on the analysis we intend to perform. However, Full mode is very often the recommended one, since we will probably also need to process the results of the transactions we are tracking.
The third synchronization mode no one talks about
There is a third synchronization mode that is not listed as an option. It is necessary to add an additional parameter when executing Geth in order to activate it. We can name this mode as follows:
- Full archive: this is a full synchronization + the saved state of the EVM for each block.
To activate this synchronization mode, add the following parameter: --gcmode archive.
What is it useful for?
This mode is necessary to know the result that a transaction would have had in the past. If you want to perform a simulation over smart contracts you do not control, you will need this mode.
A synchronized node will always have the EVM state of the last synchronized block, regardless of the sync mode. This state contains the balance for each wallet and the value of all the smart contracts internal variables. This is necessary to add new blocks to the Ethereum blockchain, since new transactions may execute smart contracts. The result of these transactions will depend on the content of these internal variables.
Example: A smart contract of an ERC20 token will have a variable with the balance (amount of that token) of all the wallets that interacted with it.
Some questions you can answer with this mode:
- What was the balance of wallet 0x78da1cc9a1f3bc5 on January 1st, 2020 at 2:00 pm?
- What was the Total Supply of USDT on July 1st?
- What was the price of DODGE on UniSwapV2 on July 1st?
- Would the purchase of 10 XX tokens for 0.1 ETH have been successful at 12:00 pm?
Launching Geth
Once we have decided the synchronization mode, it is time to launch Geth. Let’s assume the selected mode is full. We run the following command:
geth.exe --datadir C:\full --syncmode full
This will start Geth with the basics. However, it is recommended to enable the following two options:
- RPC. Through RPC we will be able to make queries about the synchronization status or about the blockchain transactions. It is essential to enable this option in order to integrate Geth with any other service/application.
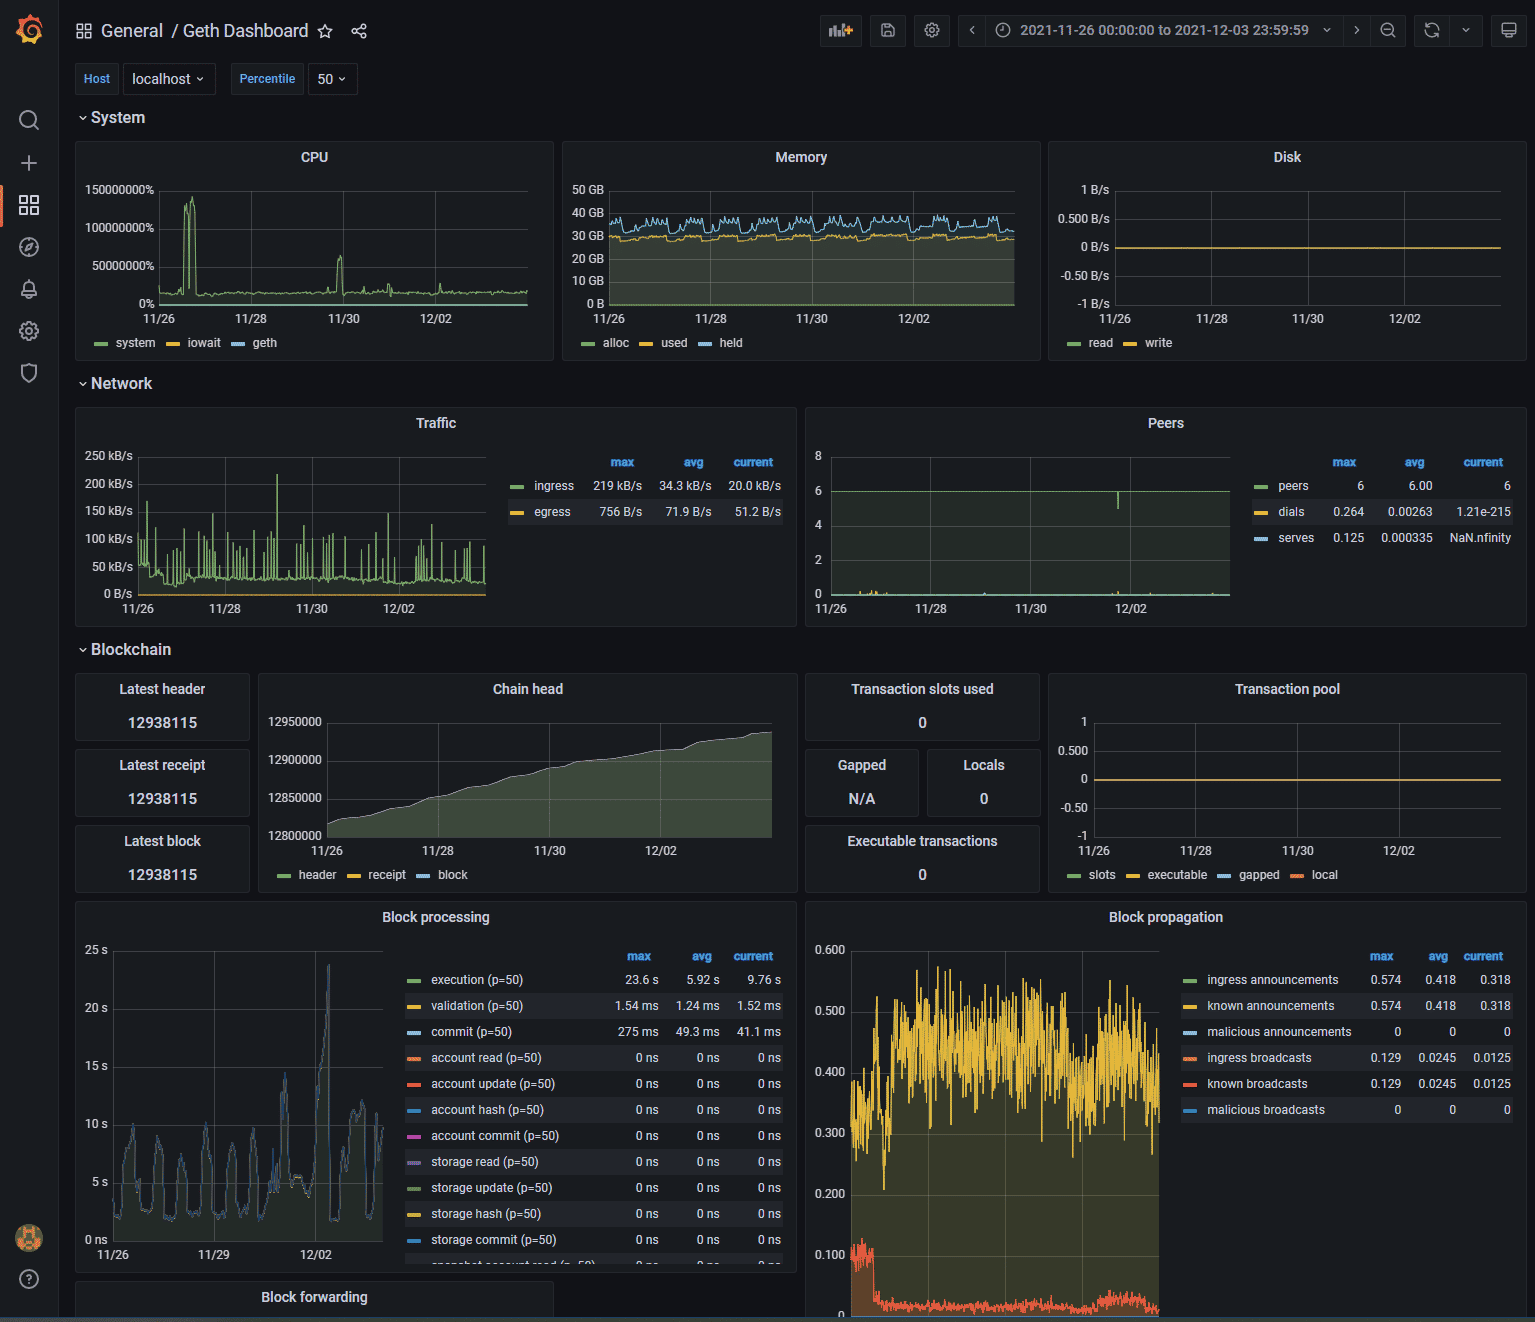
- Metrics. Metrics are not strictly necessary, but it is always useful to have access to Geth performance graphs. You will need to install an instance of influxdb.
If you also install Grafana, you can have a control panel like the following:
Run Geth as follows to include these two options:
geth.exe --datadir C:\full --syncmode full --http --http.api debug,eth,txpool,net,web3 --http.addr your_server_IP --metrics --metrics.influxdb --metrics.influxdb.endpoint "https://127.0.0.1:8086" --metrics.influxdb.username "influxuser" --metrics.influxdb.password "influxpassword"
Geth will start printing logs with the synchronization status. After a while you will see something like this:

In the above image, Geth shows the synchronization progress. This instance shows there are 3 weeks and 3 days left to synchronize.
*Tip: Do not extrapolate the time it will take to complete the synchronization, because at the beginning it will sync very fast and it will become slower as it moves forward. This is because in the past years there were far fewer transactions per block, so it now requires more computation time and bandwidth to download it.
Waiting time
Patience is required. A full synchronization can take more than 3 weeks, although it will greatly vary depending on your hardware.
A full sync + archive can take even more than 6 months. Yes, you have read it right…
Accessing the data
Once Geth is synchronized, it is time to interact with the stored data to process transactions.
Internally, Geth uses a LevelDB database to store information as key-value pairs. Theoretically, it is possible to use this database to extract information from it. However, this way of interacting with the blockchain information is vey inefficient and is totally dependent on the Ethereum client (Geth, in this case).
Web3
To solve this problem, Ethereum developers created Web3 API. This API specification allows 3rd party applications to extract information from any Ethereum node, regardless of the client.
This API exposes methods to query information about blocks, transactions, mempool, internal storage, signing of transactions, etc. The RPC option (--http) previously enabled when Geth was launched, allows the interaction with this API through the port 8545 by default.
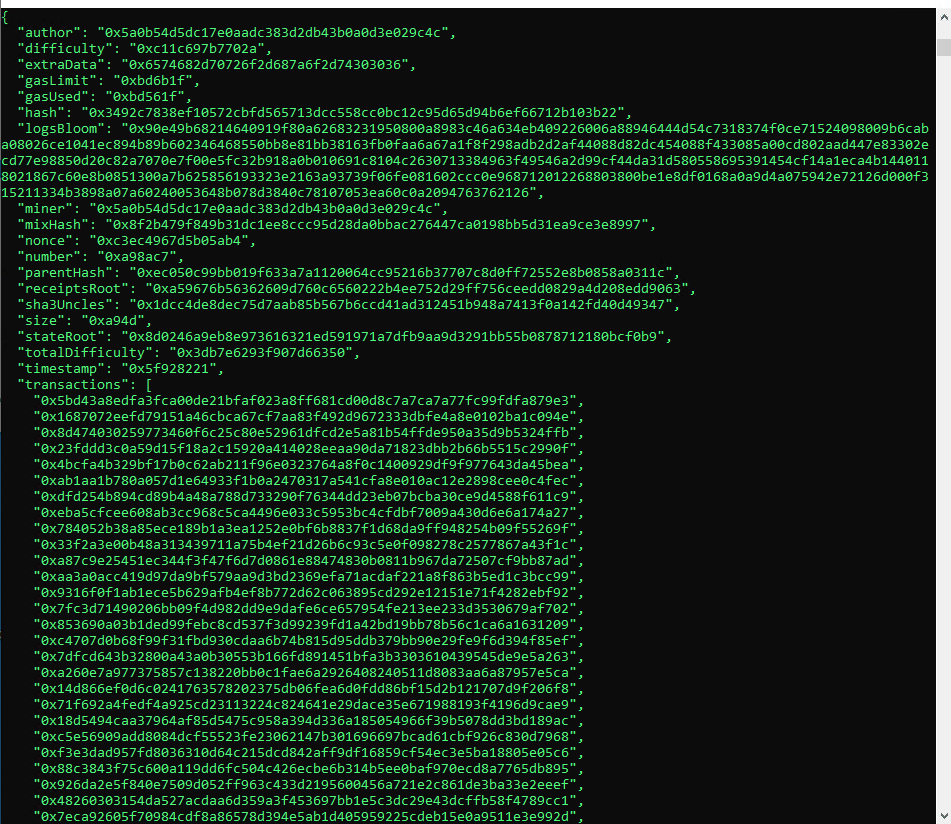
We can manually interact with Web3 running Geth itself using the following command:
geth attach https://127.0.0.1:8545
This command will connect to the Geth instance running on localhost and enable a command prompt to execute Web3 methods.
Once in the command prompt, if we execute, for instance, eth.getBlockByNumber(11111111) we will get something like the following:
Dump to local database
Web3 query methods are very limited and only focused on blocks and transactions. This is generally insufficient for analysis of thousands or even millions of transactions. It is not practical to perform thousands of Web3 method calls, digging inside the blocks, to find the right transactions to analyze. This is not a feasible approach, mainly because of the impact on performance. Even the simplest analysis could take days or weeks using Web3 methods directly.
As a solution, we opted to dump the required transactions for our study into a database. This approach will allow to perform complex queries and the creation of indexes to reduce processing times. The database can be relational or non-relational, depending on the analyses we need to perform, the structure of the queries and the available hardware.
In our case we opted for a MySQL relational database.
*Tip: When dumping transactions it is important to disable all table indexes. Otherwise each insert will trigger a rebuild of the index and the time needed for the dump will skyrocket, to the point of making it unaffordable.
Since this DB will be read-only and will not receive insert or delete commands from concurrent clients, we opted for a non-transactional MyISAM engine instead of InnoDB. The reason is that atomic changes in the DB are not required. InnoDB’s row-level locks would greatly slow down update or delete commands we may need to perform. However, this is a decision that will vary depending on each project’s requirements.
Our own Dump application
To carry out this task we will create an application in C# that will define the DB model, create the DB tables, perform the appropriate queries against Web3 and dump those results into our new model.
ORM: EF Core
It is advisable using an ORM to save development time and reduce the project complexity. In our case we have opted for Entity Framework Core, Code First.
However, it is important to emphasize that for massive data processing it is equally important to know insights of the technology we are using, in order to optimize it and adapt it to the performance requirements. The choice of ORM should not introduce significant performance impacts.
Web3 library: Nethereum
The library used to interact with Web3 is Nethereum.
We can use the following code to synchronously download a range of blocks:
public List<BlockWithTransactions> GetBlocksByNumber(int start, int end = int.MaxValue) {
    if (end == int.MaxValue)
        end = (int)(ulong)G.Web3.Eth.Blocks.GetBlockNumber.SendRequestAsync().Await().Value;

    List<BlockWithTransactions> blocks = new List<BlockWithTransactions>();
    for(int blockN = start; blockN <= end; blockN++) {
        blocks.Add(G.Web3.Eth.Blocks.GetBlockWithTransactionsByNumber.SendRequestAsync(new BlockParameter((ulong)blockN)).Await());
    }

    return blocks;
}
Two notes about the above code:
- The class
Gis a static class that contains an instance ofNethereum.Web3.Web3. - The
Await()method is an extension method that forces the task to wait until completion and returns the result.
This way we will get the information of all the transactions between two blocks. However, we can only access the “statement” of the transaction in the Ethereum Blockchain, but not its result.
To download the transaction results (that is: if it was failed or not, and the logs generated) we must download the Receipt. The following code snippet shows how:
var blocks = web3Blocks.GetBlocksByDate(1000000,1010000).ToList();
List<Task<TransactionReceipt>> tasksTransactionReceipts = new List<Task<TransactionReceipt>>();
var transactionsBlocks = blocks.SelectMany(bb => bb.Transactions).ToList();

foreach (var t in transactionsBlocks) {
    tasksTransactionReceipts.Add(transactions.GetTransactionReceipt.SendRequestAsync(t.TransactionHash));
}

Task.WaitAll(tasksTransactionReceipts.ToArray());
In this case we perform the download asynchronously to optimize performance.
Big Data
The use of these two code snippets directly it is highly discouraged to perform massive data downloads, since most likely the server will not have enough RAM to hold millions of blocks with all their transactions.
Therefore, we will need to get chunks of a few thousand blocks and dump them into the DB. It is important to carefully design it so that it runs as asynchronously as possible to reduce dump times and maximize hardware resources usage.
In our experience, the most important bottleneck is caused by Geth due to the search time required to obtain through its API the blocks and transactions information.
Dumping 12 months of transactions can take more than 48 hours.
Done!
At this point, after a “brief” wait, we will have at our disposal a populated DB with millions of transactions ready to be analyzed.
Help with next steps
Almost certainly, the raw transactions will not provide us with all the necessary information. They will contain the source, destination, amount of ETH transferred and a binary field with the smart contract information.
This binary field holds the smart contract method to execute and the parameters. In case we need that information to perform the analysis,we will need to parse these binaries. Fortunately, Nethereum supports this parsing. This will allow us to perform cybersecurity analysis and reverse engineering on smart contracts.
This parsing, in general, will only be focused on the specific smart contracts we are analyzing.
Additionally, we may need to know what the result of the smart contract interaction was, so most likely we will also need to parse those logs. These logs are totally dependent on the smart contract and do not follow any particular standard, so we will need to create an ad hoc implementation for those we are going to analyze.
Anything else?
Of course! We have everything ready, don’t we? A huge DB with a perfectly designed model and all the data we needed. Now what?
Time to apply statistics, Bayesian models, genetic algorithms, Deep Learning… or whatever you’d like.
Discover our work and cybersecurity services at www.tarlogic.com
This article is part of a series of articles about Ethereum blockchain
- We tracked 800 million transactions in the Ethereum Blockchain. Here is how we did it.
- Tracking Ethereum blockchain crypto attackers: Measuring sandwich attacks
- If you trade in the Ethereum blockchain, you will lose your money. Here is why